The Battle of Bothwell Brig, 1679
 |
| Portrait of the Duke of Monmouth from the Royal Collection Trust. |
The Royal Army
The Royal Army in Scotland numbered only about 2,000 men in 1679, and included the following formations:
- The 4th Troop of Lifeguards (see Dalton 104)
- Independent companies of Dragoons
- Captain Francis Stuart's troop
- Captain John Inglis' troop
- Captain John Strachan's troop (see Dalton 105-106)
- Independent troops of Horse
- Captain Claverhouse's troop
- Earl of Home's troop
- Earl of Airlie's troop (see Dalton 110)
- King's Regiment of Foot Guards
- 800 men in 10 companies (Ede-Borrett 66)
- Earl of Mar's Regiment of Foot
- 600 men in 10 companies (Ede-Borrett 79)
(See also Childs 197, 200)
Some sources only count these regular troops when considering the Government army at Bothwell Brig, but they were supplemented in the vicinity by eight regiments of Lowland militia, perhaps up to 5,000 men, including:
- East Lothian Militia
- Merse Militia
- Perthshire Militia (two regiments)
- Fife Militia (two regiments)
- Angus Militia
- Edinburgh Militia
These were also joined by four pieces of cannon, probably light "leather guns," commanded by a German lieutenant John Schlezer, but he seems to have had only one other gunner and three other men to help him service the guns (Dalton 50-51, 56). When the Duke of Monmouth was appointed "General of all the Forces in Scotland" in 1679 to deal with the Covenanter Rebellion around Glasgow, he arrived in Edinburgh with three additional English troops of horse (Childs 202, Dalton 119). Some have inserted whole regiments of English foot into the Government army at Bothwell Brig but Monmouth had only left London ten days before the battle, so it seems likely that the only English troops present were the following troops of horse:
- Gerard's (Monmouth's Own) Horse:
- Lt. Col. Edmund Mayne's Troop
- Royal Dragoons:
- Major Theophilus Oglethorpe's Troop
- Captain Henry Cornewall's Troop
The Battle of Bothwell Bridge, June 22nd 1679
 |
| The approach of Monmouth's army to the battle from the north. |
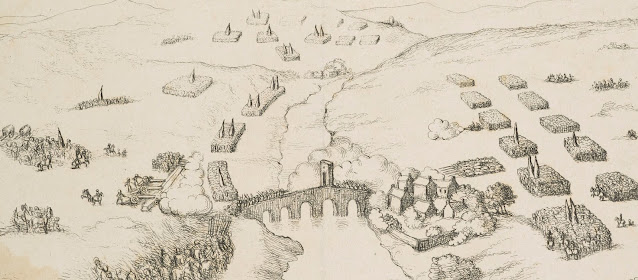
As mentioned in my previous post, the covenanter army led by Sir Robert Hamilton had abandoned their position at Airdrie on June 18th, to fall back to Hamilton south of the River Clyde, and it was in this position that they met Monmouth's government army on June 22nd, in front of their camp opposite Bothwell Bridge. While the forces were more evenly matched by way of numbers, the government troops were much better armed and disciplined, though the Covenanters rebels held the better position. It would be impossible to compile an order of battle for the Covenanter army, only a general picture of their composition may be given; between 6000-8000 men, some good troops of horse with only a few hundred formed up as a body of musketeers, supported by a single leather gun. From the contemporary drawing below which shows the Covenanters on the right, it was evident that they were organized enough to be formed into battalions, perhaps along factional lines within the Covenanting movement (Dalton 57).
 |
| Contemporary drawing of the battle. |
Oglethorpe's English Dragoons arrived first of all the Royal Army, surprising the covenanters who had been posted to guard the barricades on Bothwell Bridge. There followed some skirmishing but the Covenanters held their ground, until both sides came together in parley as Monmouth arrived with the main body (Childs 202). Monmouth was the 30-year old illegitimate son of King Charles II, an able and experienced soldier. It is evident that the Duke came with mercy on his mind, and beat a parley to offer the King's mercy to all rebels who would lay down their arms and go home, and gave them half an hour to discuss amongst themselves. This offer of pardon was well received by many men in the "moderate party," who merely wanted redress for their grievances and a relaxation of the persecution that the Covenanters had faced the past 19 years. These men were ready to submit, but they were bitterly opposed by the men of the "honest party," the hardliners like Hamilton, Hackston, and Burley, whose "Ruthven Declaration" had denounced those who had previously partaken of the King's indulgence (Aiton 68). Sir Robert Hamilton wryly said that he would consent to a cessation of hostilities:
If they were willing to have the Duke of Monmouth informed of his father's, his own, and his associates' rebellion against God, by their blasphemy, persecution, and usurpation of Church and State... and to desire him to lay down the weapons that he had taken up against the Lord and his people; to that he would consent, but to no other thing.
This was the kind of pluck that would be praised if the Covenanters had met with better success at Bothwell Brig, but in the light of defeat seems rash and indefensible, so it would be good to consider the debates that fell out among the Covenanters at this point.
Undeniably, God had blessed their efforts thus far, had given them victory at Drumclog and delivered Glasgow into their hands without a shot after their first repulse. Now they held a good blocking position along the Clyde, but nevertheless, a battle against regular government troops was an uncertain matter. Therefore, the King's pardon seemed like an answered prayer to the moderate Covenanters. Would it not be putting God to the test to continue resisting in arms against a lawful King so mild? No, answered the hardline Covenanters of the "honest party", had not the King broken his covenant? Were they so swiftly running to whore after a King who had imposed a false form of government over the church, and had slain the people of God by the sword? The man who could trust the word of such a king was not trustworthy himself. The hardline Covenanters have been criticized for not moderating their position at this point, but this author does not necessarily agree. It would have been far better to fight and impose terms on a defeated royal army, than to accept an uncertain pardon from an untrustworthy king. However, what has unforgiveable was that all these debates were raging while Monmouth's parley was slowly expiring, and by the time the Duke had brought his cannon up and began firing on the barricades, the covenanter army was already fragmented. The battle after this point can be told in only a few words.
David Hackston, commanding the body of musketeers, boldly held the bridge for as long as powder and shot held out, even forcing the government gunners to flee their position after one volley. However, ammunition ran out and none was forthcoming from the covenanters posted above the bridge, still riven with internal strife. Without any means of returning fire, Hackston was forced to abandon his exposed position, and Oglethorpe's dragoons quickly crossed the bridge and formed up on the other side. Two troops of Covenanter horse drove these dragoons back, but were soon ordered by Sir Robert Hamilton to fall back as more government horsemen crossed Bothwell Bridge and formed up on the south bank of the Clyde (Aiton 72). With the key to their position lost to the government forces, many moderate Covenanters immediately began to flee, exposing the bravest of the "honest" Covenanters to attack from the government cavalry fanning out around them. Captain John Graham, the laird of Claverhouse who had been routed at Drumclog just three weeks before now joined in a slaughter that left hundreds dead on the retreat (Childs 203).
Had the Duke of Monmouth begun the battle forthrightly with guns blazing, the Covenanter army likely would have held firm, and possibly even withstood their enemies. But as it was, Monmouth's offer of clemency did more to fracture the Covenanter's cause and army more than a thousand cannonballs. It was the prerogative of the victors to slaughter whatever fleeing rebels they could find, but Monmouth denounced this as "work only for butchers," and it was his orders to cease the bloodshed that allowed 1,200 prisoners to be taken (Dalton 57). The rebellion was thoroughly broken and the Covenanters would no more be a significant threat, but much more bloodshed would follow in the decade to come.
Soli Deo Gloria!
Works Cited
Aiton, William. A history of the rencounter at Drumclog, and battle at Bothwell Bridge, in the month of June, 1679, and reflections on political subjects. Hamilton: W. D. Borthwick and Co., 1821. https://catalog.hathitrust.org/Record/009722308.
Childs, John. The Army of Charles II. Toronto: University of Toronto Press, 1976.
Dalton, Charles. The Scots Army, 1661-1688 : With Memoirs of the Commanders-in-chief. London: Eyre and Spottiswoode, Ltd, 1909.
Ede-Borrett, Stephen. The Army of James II, 1685-1688. Warwick, England: Helion & Company, 2017.


Comments
Post a Comment